Now as you can see this isn't straight and it's darker on one side than on the other… but both these things can be fixed.
First I used the perspective transform tool in PhotoShop:
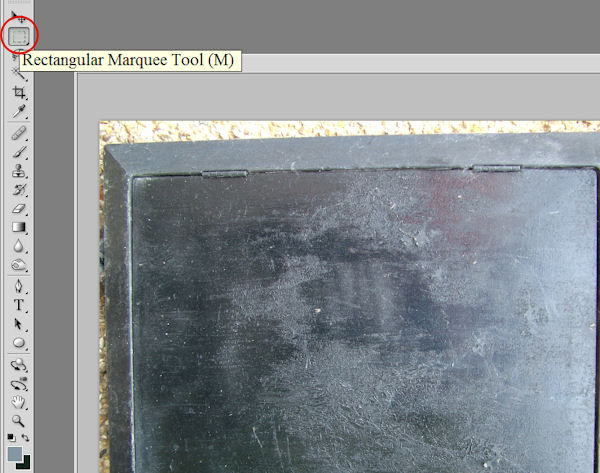
And to use this tool you need to first select the entire image by using the Rectangular marquee tool to draw around it, thus selecting it:
The select the Perspective Transform Tool, selecting it from the Edit/Transform/Perspective menu:
If you find this option greyed out, then most probably the image is not selected using the Rectangular marquee.
If you find that Transform Perspective doesn't quite complete the job, you can tweak it with the Transform/Warp tool:
While I was doing this I decided to crop the image as well to select just the nicest part of it for my texture:
This also meant I didn't have to clone over the lock or the hinges or the bevelled edges of the box (although liking the colour and texture along the bottom I decided to clone over the lock after all, it only took one click.)
Now to remove the difference in light and dark on the image, I just created a new layer and used a gradient, picking colour from the dark side of the image for the background colour and from the lighter side for the foreground colour.
After this use of the gradient, the bend on the plate in each corner becomes a little more obvious, so some cloning is necessary to remove it, resulting in this:
Now that stage one is completed, I have a texture that will be useful in more than just this one UV Map.
Stage 2
Now this texture is not tiled, but as I am intending to use the whole thing only once - that's not necessary for this job.
This is what I want it for:
This circular grey area, the front plate of this airlock model is where it will be used… but not on its own, first there is some work to do on it. I have kept this model as simple as possible, but a good texture can seriously enhance any model, and as I intend to add a few embellishments to this seemingly flat surface, I hope this to be the case here too.
Okay, so I want to add some raised surfaces to this flat circle, and perhaps some extra texture not immediately present in the original texture from the railway station.
So for this I will be using the shapes tool.
First I've opened up my UV map, which as you can see is just a simple circular map, I then need to select the texture we just worked on, using the rectangular marquee tool again.
Now the texture is much bigger than the UV map, so it will appear a bit blurred and we won't immediately see all of it, but we can fix that too.
Having selected the texture image I just press Ctrl C to copy it to the clipboard, you can also go to the Edit menu and select 'Copy' from that menu, if you prefer.
Then selecting the UVMap (clicking the top bar of that image), I just click Ctrl V (Edit Menu, select 'Paste' from the menu) and PhotoShop pastes the texture into the UVMap image as a new layer.
Now, I then click Ctrl T (you can go to the Edit menu and select 'Free Transform', not 'Transform' or any of the choices from that submenu, just 'Free Transform' - if you prefer, but Ctrl T is quicker). Then using the top left hand transform tool handle:
I drag the layer from top left to somewhere nearer to bottom right, I do this a few times until I can see the whole texture, now you can see that I've got my texture fitting across the UVMap okay, but because the original texture image was oblong and not square like the UVMap is, my texture doesn't fit to the bottom of the UVMap, but 'Free Transform' doesn't just give you handles at the corners, you get them along all edges too. So all I have to do is grab this handle:
And drag the texture down to the bottom edge of the UV Map, for it to fit perfectly.
Next I lower the opacity of the texture's layer a little, just enough to see the UVMap below.
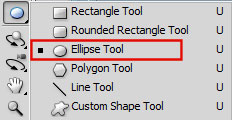
Then I choose the shapes tool: and from that sub menu (little arrow bottom right corner of the shapes tool) I make sure I have the 'Ellipse tool' selected:
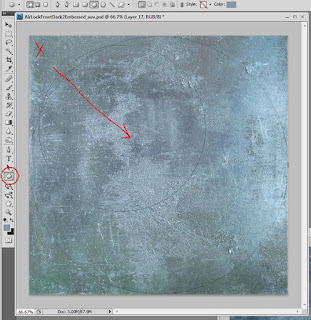
And then I click in the top left hand corner of the image and HOLDING DOWN THE SHIFT KEY drag my cursor from top left to bottom right. (The shift key ensures I always have a perfect circle, rather than a squashed one or ellipse). Now with the opacity lowered you can see that the circle of the UV Map's edge just fills the image edge to edge, (Big circle) but because I don't want this circle to be exactly the same size as the UV map circle, I'm starting my ellipse shape where the X is, just a little in and down from the top left-hand corner - as I drag my cursor in the direction of the red arrow, you can see my circle growing (Small circle) I will keep dragging until it's just a little smaller than the UVMap circle and fits just inside it with a small gap between them, once I let go of the cursor, the circle will fill with the foreground colour, which I've chosen to be a mid to light grey.
Now that I have my circle - and if you find that yours isn't exactly centered inside your UV map (if like mine your map is circular) then you can use the move tool to move the layer around until it is correct, (the up down and left and right keyboard arrows allow you to move the layer 1 pixel at a time for precise adjustment):
Now we need the Layers Style, go to Layers/Layers Style/Blending Option/Bevel and Emboss, here are the settings I used:
But we haven't finished with this menu, underneath Bevel and Emboss on the left, sits Contour and Texture, on this occasion we just need Contour, we'll look at Texture later on in this tut.
In contour these are my settings:
Some of the other settings are nice too play around with them to see what effects you get - if the little 'Preview' box is ticked you'll see the results instantly on your texture as you try them out, I like 'Cone' for this particular texture as a circular disc with a raised edge is what I'm after.
Okay, I then set this layer to Multiply, Overlay is good too, but in this instance I wanted more than Overlay was giving me so I went for Multiply.
In the same way that we did before, create another circle using the Shapes Tool with Ellipse and the shift key (to ensure we get a circle) this one should just fit inside the first one like this:
Now we need to hide the texture layer and the layer with the first circle in it:
Make sure you are still on the layer with the 2nd circle on it, and click on Select/'Colour Range'. You will be presented with the colour range box and your cursor will change into an eye dropper, use the eye dropper - hovered over the grey circle - to choose that grey.
If you try this with the texture layer unhidden then parts of the texture will also be selected, and we want just the small circle, (the same applies to the larger circle).
you now have a selection just the size of the smaller circle, go to 'Select/Save Selection and save the circular selection as… well I called it 'Inner Circle'.
Turn the texture layer back on, (click where the eye would be) and use the rectangular selection to select the entire texture, press Ctrl C to copy the texture, go back to the 2nd circle's layer, go to 'Select/Load Selection' and click on the 'Inner Circle' or whatever you called the selection of the small circle when you saved it.
Now go to the edit menu and click on 'Paste Into' (or use Shift Ctrl V) - you should find that the original texture has pasted into the smaller circle.
Create a new layer and create a new circle on this one - make this one a very small circle and I positioned mine around the top left of my inner circle.
Here are the settings for Bevel:
Contour:
and Texture:
here is the pattern in case you don't have one like it, it's called "CarbonFibre".
Simply copy or move this pattern file into your
Program
Files/Adobe/PhotoShop/Presets/Patterns folder.
Now I need 2 more circles but no need to go
through all that again, now I just need to copy the layer - twice.
Now I want another shape to sit in the centre, so this time I'll use
Custom shape, and in the little drop down menu on the top bar: I'll search for a triangle: when you've got
it, just click drag and release the cursor, and you'll have a nice triangle:
Happily it fills with the same texture, contour and bevel as the last shape, so less work there.
Now I have plans for this shape, so I used Ctrl T to rotate the shape around, if you hover the cursor near the top corner (any corner actually) a curved double headed arrow appears, when this is present, click and drag to rotate the shape to where you want it, I put mine like this:
Now before the age of computers had me sitting at a desk designing things I did other design or craft things and a long time ago, I created this weird design, stamped it onto some special material, heated it, and found myself with a piece of (fake) leather with an embossed design on it, I (much later) scanned a selection of these embossed designs into my PC, when I found them the other day…
So, on one of these I selected half of the design, and using the freehand selection tool I traced around it, mirrored it and …eventually ended up with a design that I was able to turn into a brush for Photoshop, this is what I used for this last step, but anything will do, even one of the symbols from the Custom Shapes Tool.
Here's mine:
And here's one done using the 'Radiation Warning' sign from the custom shapes:
And here are the settings I used for the Bevel:
and here they are for the colour:
Now I found that I could intensify the effect simply by copying the layer once or twice.
 It really depends on what texture you try putting this sort of thing on top of, I've found that a darker texture underneath and I only needed 1 layer with the embossed stamp, this texture is lighter, and seemed to need two or 3 layers of this stamp.

And this is the rendered result of the texture I just
made:
I hope you have enjoyed this tutorial and use it to
create great textures.
I have more tutorials here:


